How to Scrape Daily Plane Ticket Prices with Browserbear and Zapier
Contents
In today’s world where air travel has become commonplace, it’s no secret that prices for plane tickets can fluctuate frequently. While the convenience and time-saving benefits of flying longer distances are undeniable, keeping an eye on the latest prices can be a daunting task.
Manually visiting airline websites on a daily basis is time-consuming, and there’s always a chance you’ll miss a good deal. However, there is a solution that can help you secure the best fares: automated data extraction. By harnessing the power of scraping tools, you can effortlessly monitor prices and even set up notifications that tell you when to nab a ticket.
In this article, you’ll learn how to set up a workflow that extracts ticket pricing data on a schedule, ensuring you get the best flight prices—and you’ll do it all without code!
What You Will Create
Having flight ticket pricing consolidated and conveniently accessible in a single spreadsheet makes it easy to spot great deals and take action. You can also use the information to analyze average flight times, routes, pricing trends, and more.
We’ll be using the AirAsia website to collect sample data for this tutorial, but similar principles should apply for most flight search engine sites.
The tools you will be using to collect and present pricing data automatically are:
- Browserbear : To extract flight data from search engines
- Google Sheets : To generate URLs and store scraped data
- Zapier : To trigger actions in different programs based on pre-specified commands
By the end of this tutorial, you should have a spreadsheet with new sets of pricing data added every time a task run takes place.
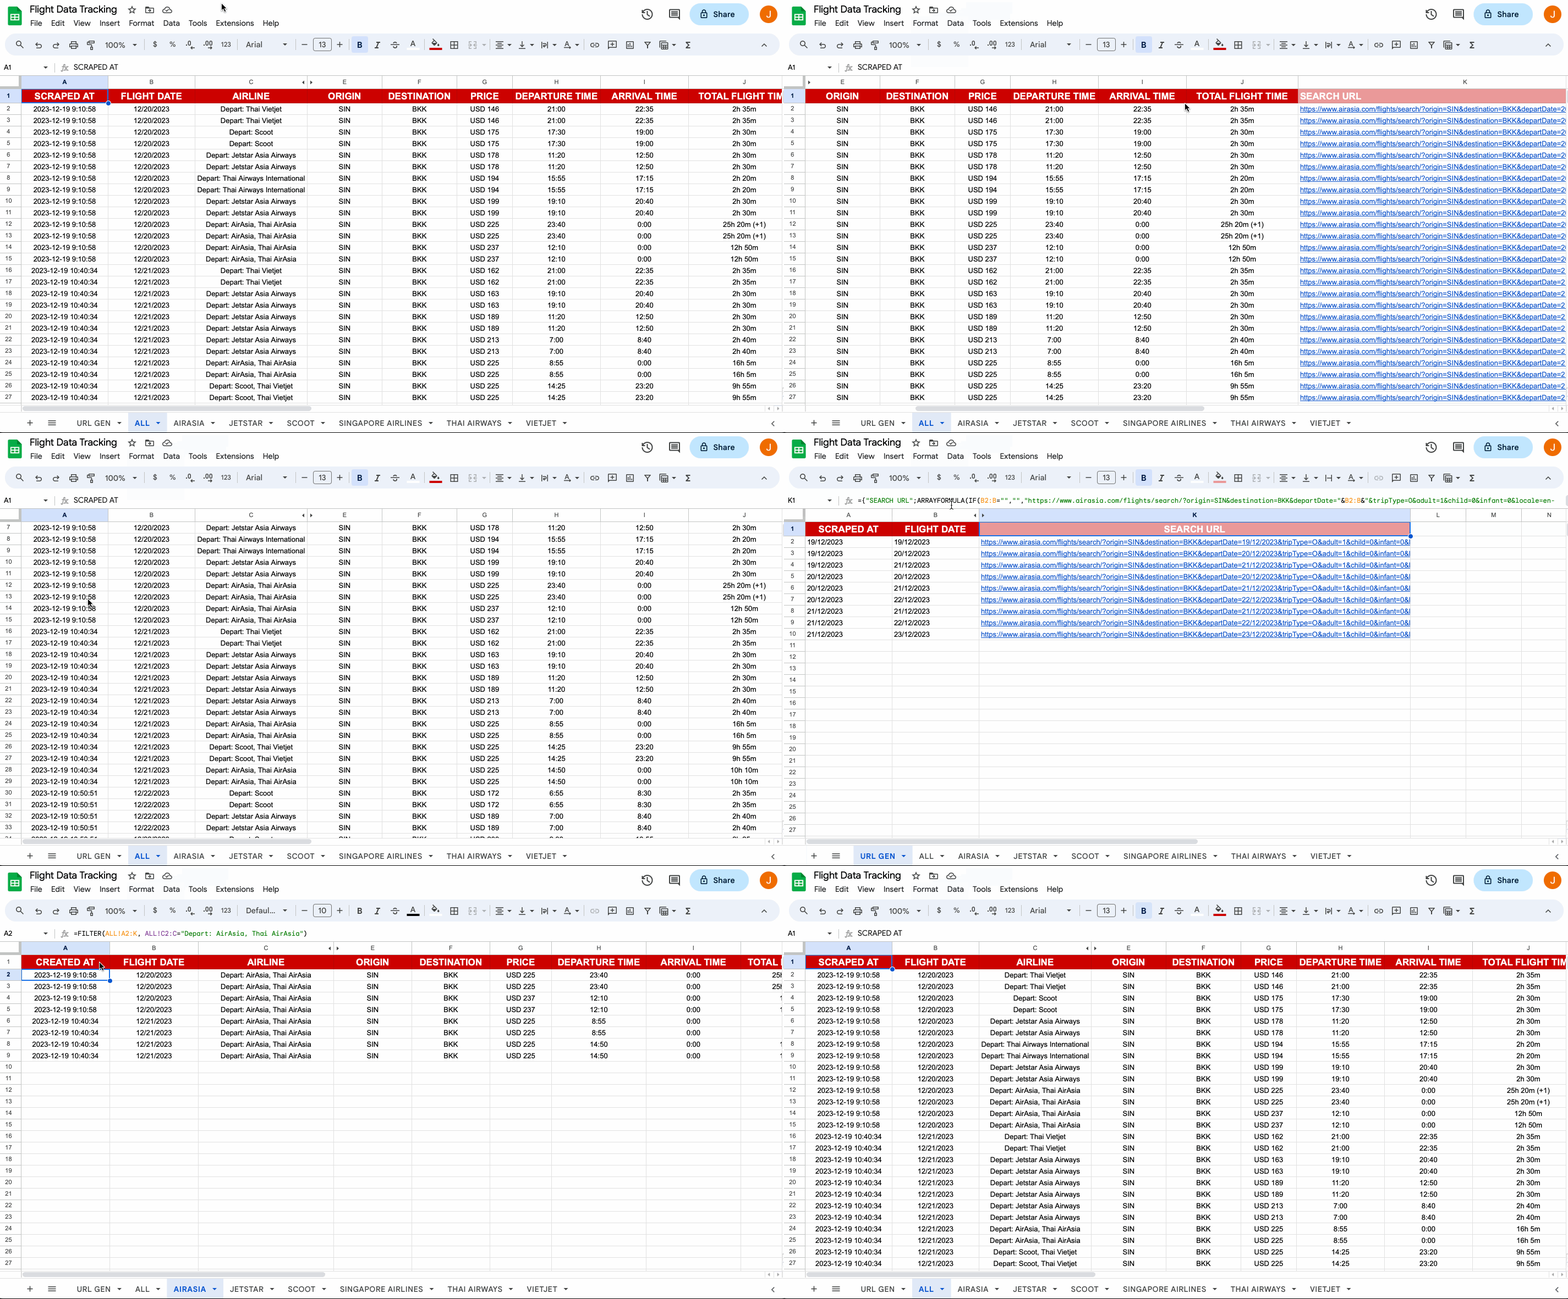
Let’s start with setting up a spreadsheet, then we’ll move onto automating it.
Prepare a Google Sheet for URLs and Scraped Data
Google Sheets serves as the database for this tutorial to store search URLs and extracted data. The app doesn’t have hard limits on the number of rows you can create in one API call, making it a great choice for tasks like scraping that involve large amounts of structured data.
Log into your Google Sheets account and create a new spreadsheet. You’ll need to create a minimum of two sheets for this tutorial, although you can add more for organization purposes.
Sheet 1: Search URL Generation
The first sheet will contain dates and search URLs generated using a formula. Create headers for:
- Scraped At
- Flight Date
- Search URL
Format your headers however you’d like.
In the Search URL header cell (C1), you’ll have to insert a formula that generates URLs matching your requested flight date and search parameters. It will look something like this:
={"SEARCH URL";ARRAYFORMULA(IF(B2:B="","","https://www.airasia.com/flights/search/?origin=SIN&destination=BKK&departDate="&B2:B&"&tripType=O&adult=1&child=0&infant=0&locale=en-gb¤cy=USD&airlineProfile=k%2Cg&type=bundled&cabinClass=economy&isOC=false&isDC=false&uce=false&ancillaryAbTest=true"))}
Keep in mind that you will have to replace the base URL with one matching your own search parameters.
Building a Base Search URL
The site we are working with uses URL parameters to return matching results. You’ll have to create a base destination URL with your specifications, then insert it into the formula. A search URL will likely look something like this:
https://www.airasia.com/flights/search/?origin=SIN&destination=BKK&departDate=01%2F01%2F2024&tripType=O&adult=1&child=0&infant=0&locale=en-gb¤cy=USD&airlineProfile=k%2Cg&type=bundled&cabinClass=economy&isOC=false&isDC=false&uce=false&ancillaryAbTest=true
Some modifiable parameters for AirAsia’s site include: origin, destination, departDate, tripType, locale, currency, airlineProfile, type, and cabinClass. Make adjustments as needed, then insert the URL into the formula.
Your sheet, when populated with sample data, should look similar to this:

Bear Tip 🐻: An easy way to get the URL you need without having to build it from scratch is to perform a manual search on the site, taking care to filter for all of the specifications you need. You can then copy and paste the URL from your browser’s search bar, only modifying the departDate parameter to match the formatting in our example.
Sheet 2: All Extracted Data
The second spreadsheet will contain all of the extracted data from your task runs. Create headers for all the information you want to scrape. We will be using:
- Scraped At
- Flight Date
- Airline
- Origin
- Destination
- Price
- Departure Time
- Arrival Time
- Total Flight Time
- Search URL
Make any desired formatting changes.
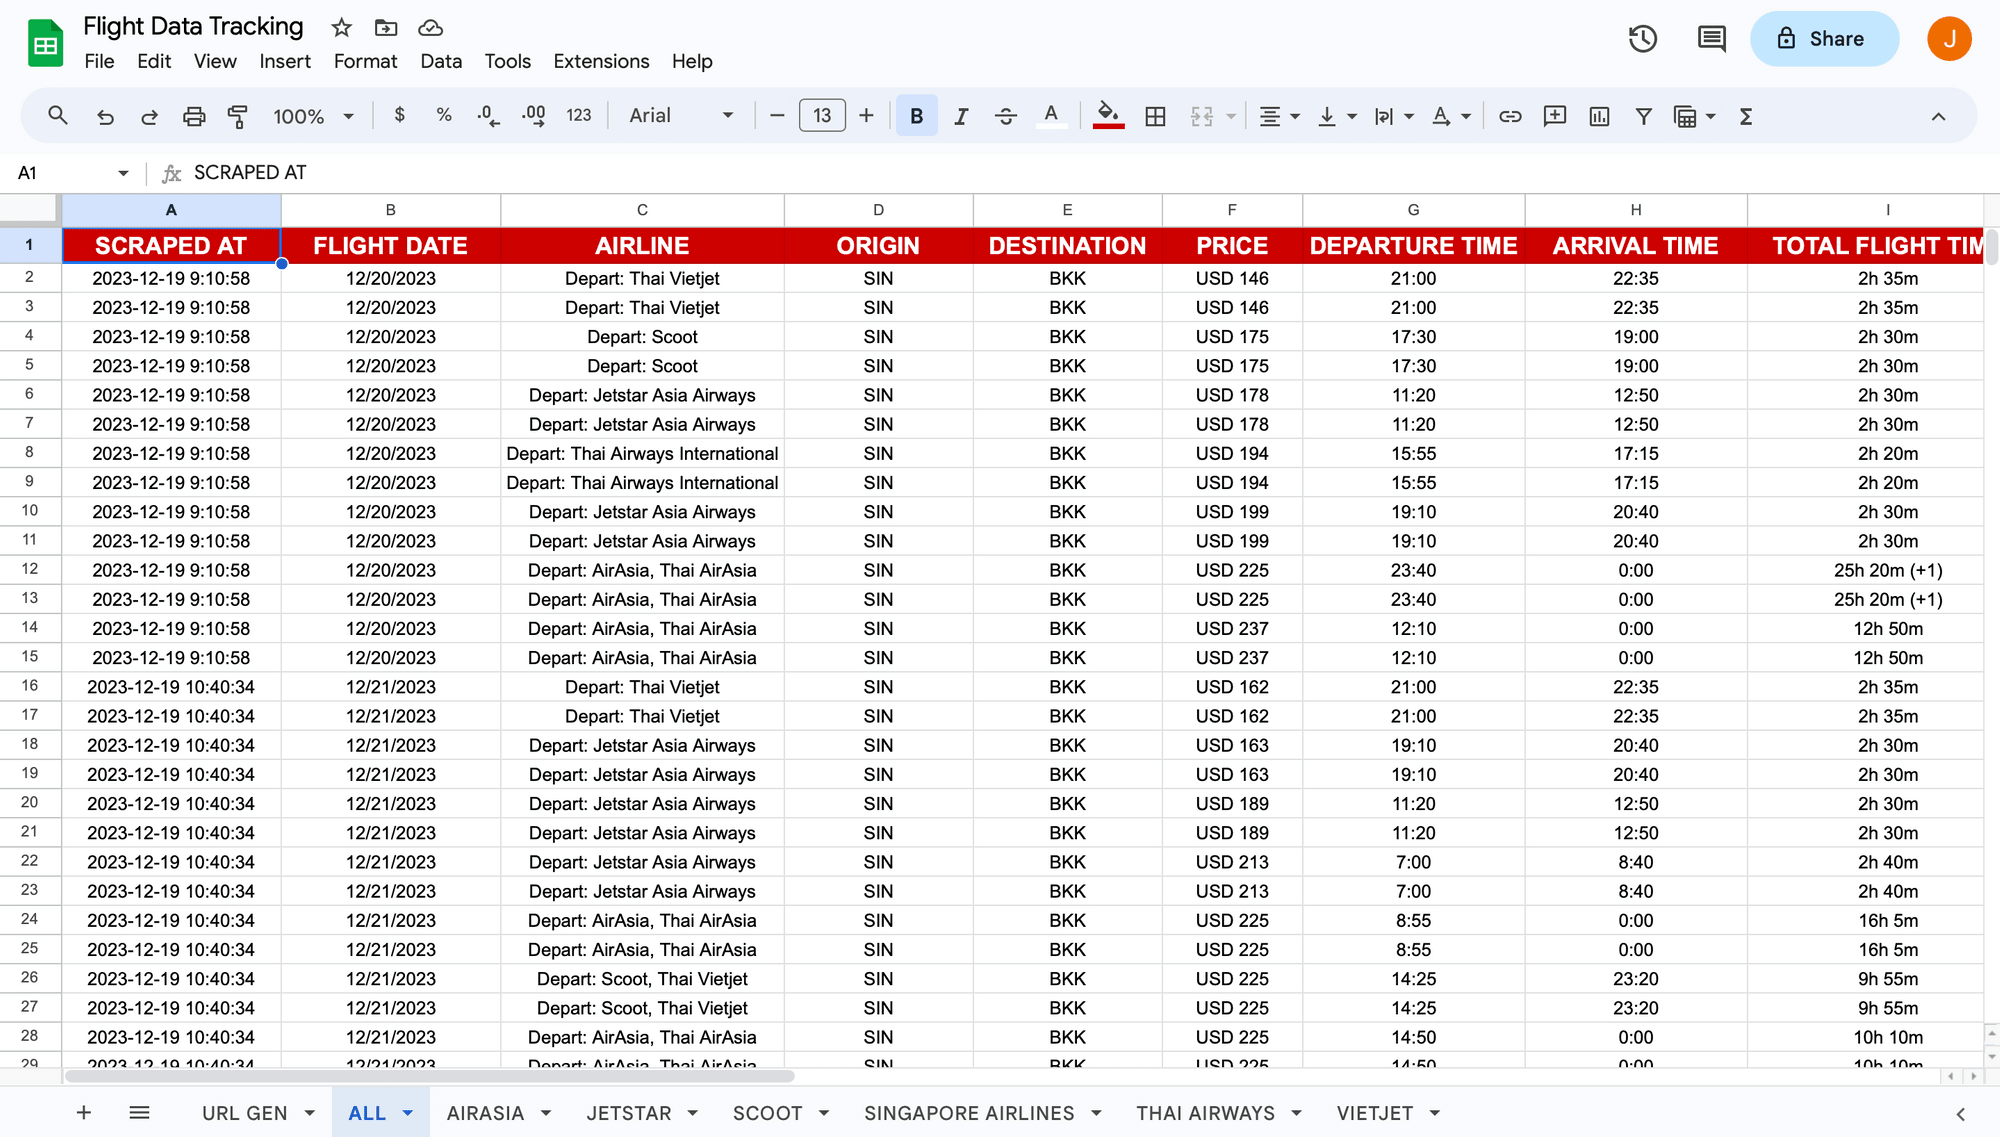
Because this sheet will only hold extracted data, it doesn’t require any formulas. However, you can add filters, additional spreadsheets, and other features to better suit your needs.
When populated with sample data, the second sheet will look similar to this:
Bear Tip 🐻: Use the FILTER formula (FILTER(range, condition1, [condition2, …])) to sort large batches of data into different sheets. This can be helpful for setting up automated tasks based on specific results (eg. take an action when a new flight from a certain airline is added to the spreadsheet) or just for easier viewing.
Create a Browserbear Task for Data Extraction
A fairly simple task will instruct Browserbear to navigate to each ticket search URL, and then extract structured data from each flight matching the set parameters.
Log into your Browserbear account (or create a free trial account if you don’t have one—no credit card required! 🎉). Go to the Tasks tab, then click Create a Task.
You will now be able to insert a starting URL, which can be your base URL:
https://www.airasia.com/flights/search/?origin=SIN&destination=BKK&departDate=01%2F01%2F2024&tripType=O&adult=1&child=0&infant=0&locale=en-gb¤cy=USD&airlineProfile=k%2Cg&type=bundled&cabinClass=economy&isOC=false&isDC=false&uce=false&ancillaryAbTest=true
Keep in mind that you will need to use a future date as the site only shows results for upcoming flights. The starting URL will be dynamic when built into a zap, so the link you use at this stage is just for testing.

After clicking Save , you’ll be on a task page where you can add additional steps, run your automation, and view completed runs.

You can rename your task and edit the settings by clicking the three-dot menu next to the title and selecting Edit Task.
Bear Tip 🐻 : Some websites’ bot protection measures might block Browserbear from interacting with their sites. If you’re getting blocked, you may have to play around with the user agent, fingerprint, and proxy options in the Edit Task menu until you find something that consistently works for you.
When you’re done, return to your task page and set up the following steps:
Step 1. Go
The starting URL you placed will already be added as the first step: Go. This can optionally be changed to a dynamic field in Zapier so you can scrape data from multiple search URLs.
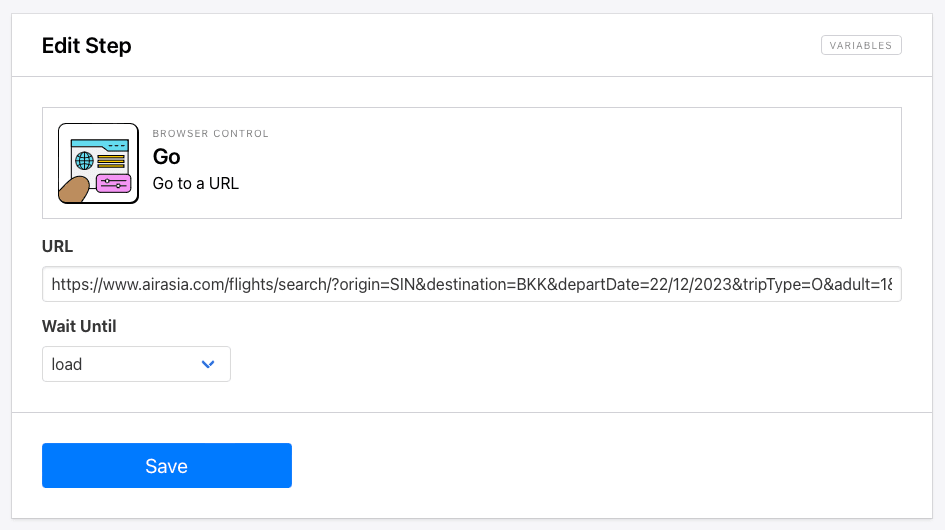
Networkidle is the default wait instructions and the safest setting, but you can test the load or domcontentloaded settings to see if they work for you.
Step 2. Save Structured Data
Add a new step and choose Save Structured Data as the action.
Use the Browserbear Helper Chrome extension to isolate and generate config for the parent container of a review, then enter the details for each child element with the Data Picker in the Browserbear app.

Be sure to click Add Data after defining each child element.
Click Save.
Bear Tip 🐻: For more help using the Helper to retrieve configs, refer to our article on element selection.
Running the task should yield output in a JSON array that includes all the specified data:
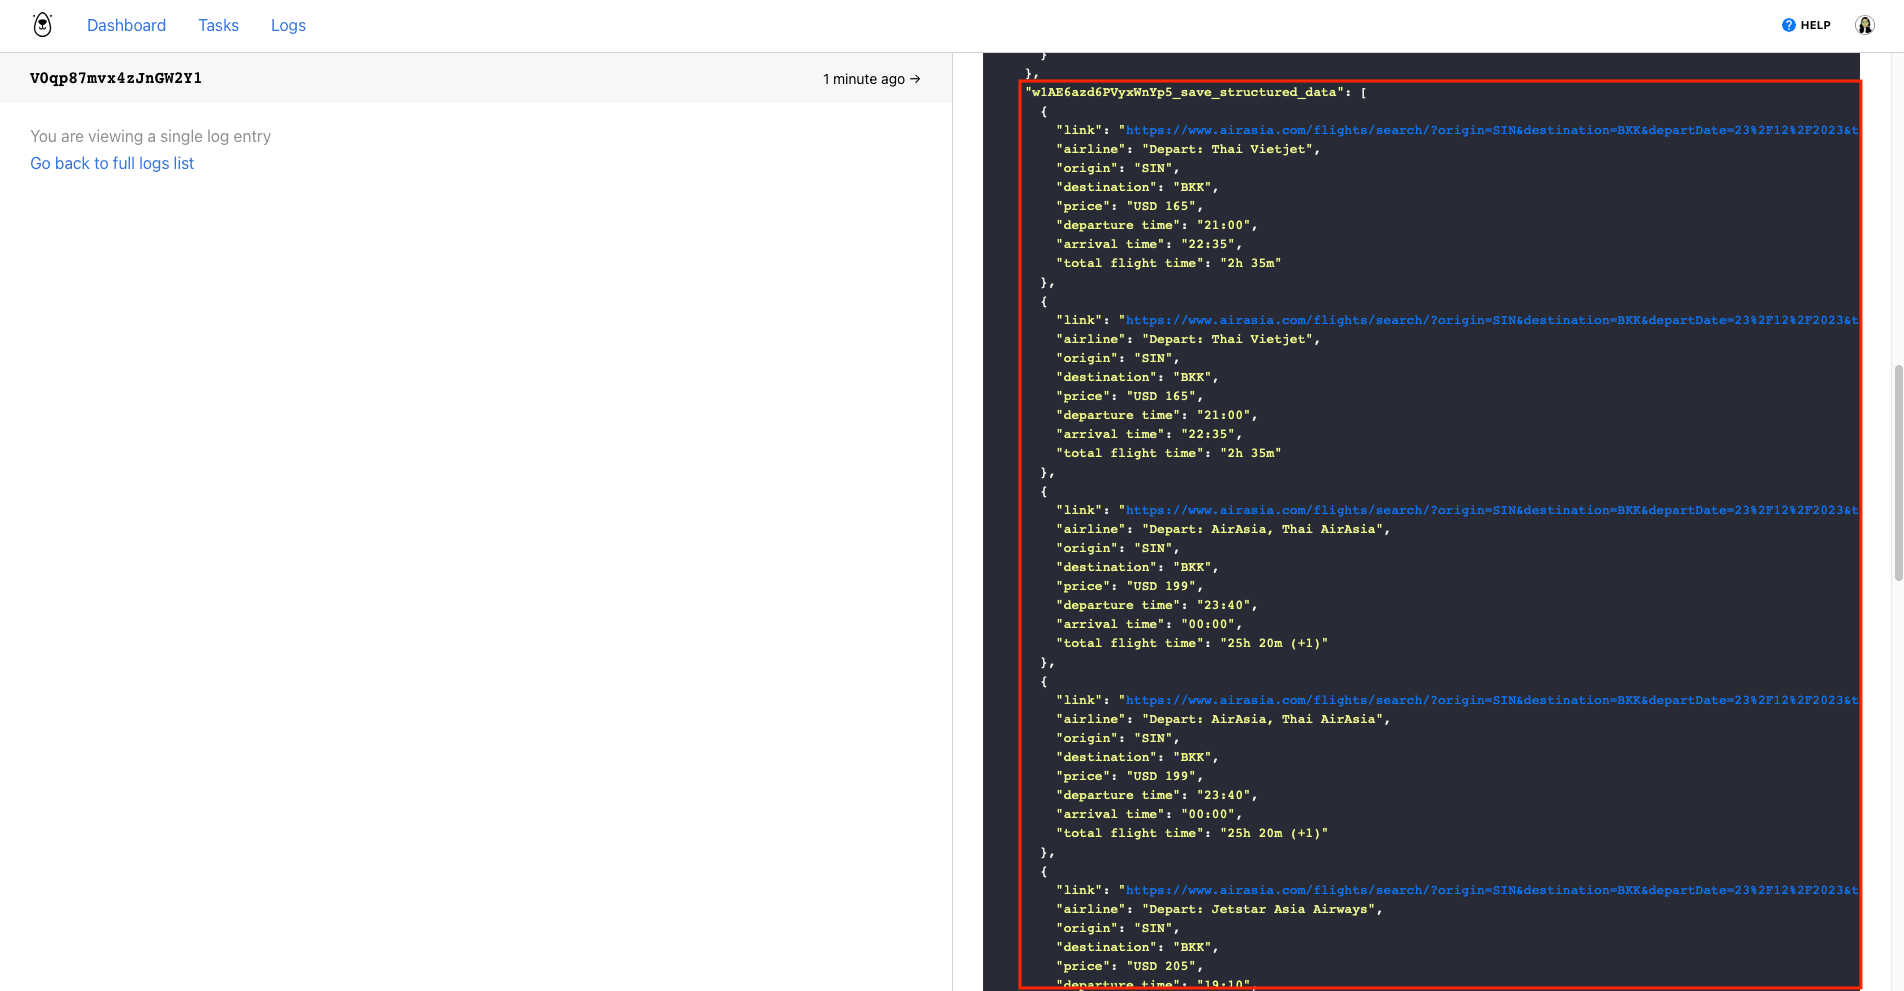
Test the task a few times to ensure consistent results, then proceed to the next step.
Set up a Zap to Save Upcoming Dates to Google Sheets
This zap will generate upcoming dates and save them to Google Sheets so search URLs can be prepared for scraping.
Log into your Zapier account, click + Create Zap , and set up the following events:
Trigger: Every Day in Schedule by Zapier
Choose Schedule by Zapier as the app and Every Day as the event.
Set up the trigger by specifying the frequency at which you would like your automation to run.
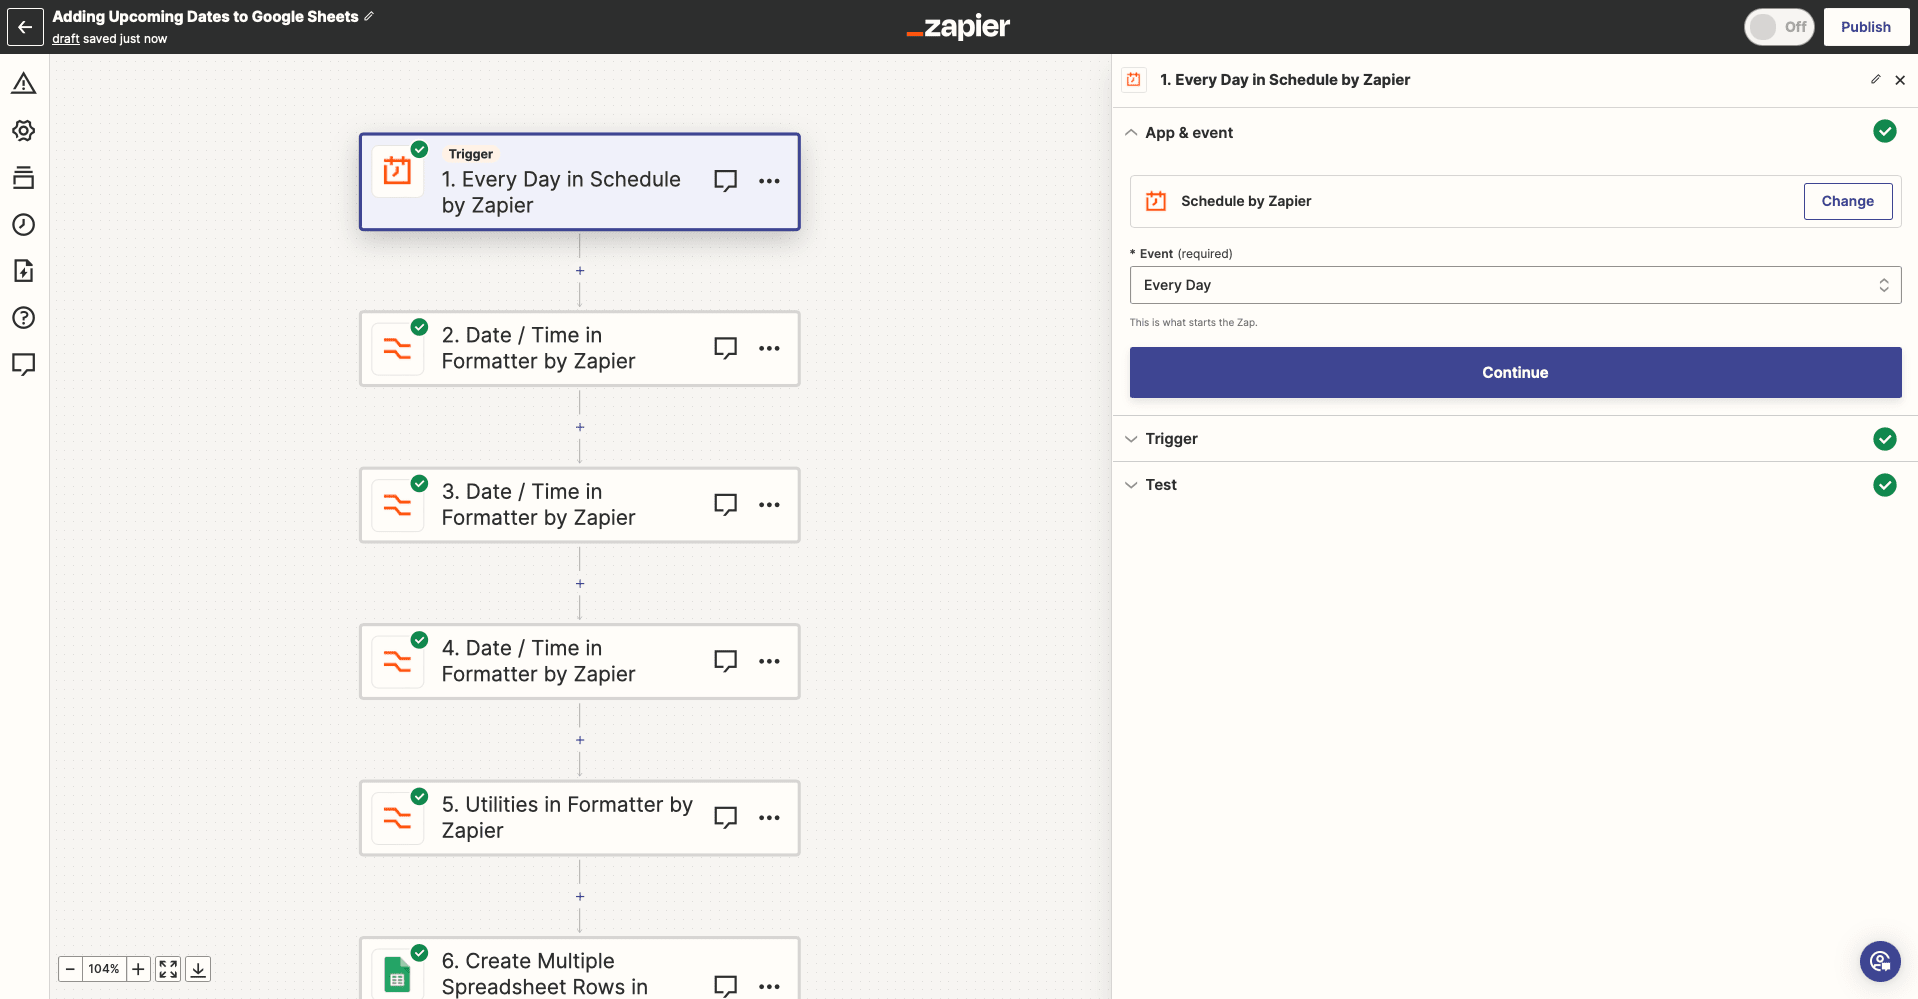
Test the trigger, then continue.
Action: Date / Time in Formatter by Zapier
Choose Formatter by Zapier as the app and Date / Time as the event.
Select the date from the previous step as the input, then transform it into the format we need for the URL: DD/MM/YYYY.

Test the action.
Action: Date / Time in Formatter by Zapier
Choose Formatter by Zapier as the app and Date / Time as the event.
Select the date from the previous step as the input, ensuring it’s in the DD/MM/YYYY format. Insert the formula +1 day in the Expression field.

Test the action, ensuring the output is still in the correct format.
Repeat this action as many times as needed, increasing the date addition each time (+1 day, +2 days, +3 days… ). This will allow you to scrape data several days in advance.
Action: Utilities in Formatter by Zapier
Because the dates are individual items generated in separate steps, we now need to compile them as line items. This makes it possible to add them as multiple Google Sheet rows in one API call.
Choose Formatter by Zapier as the app and Utilities as the event.
Set up the event by choosing Text to Line-item as the transform type, then adding each of the dates as comma-separated input items.
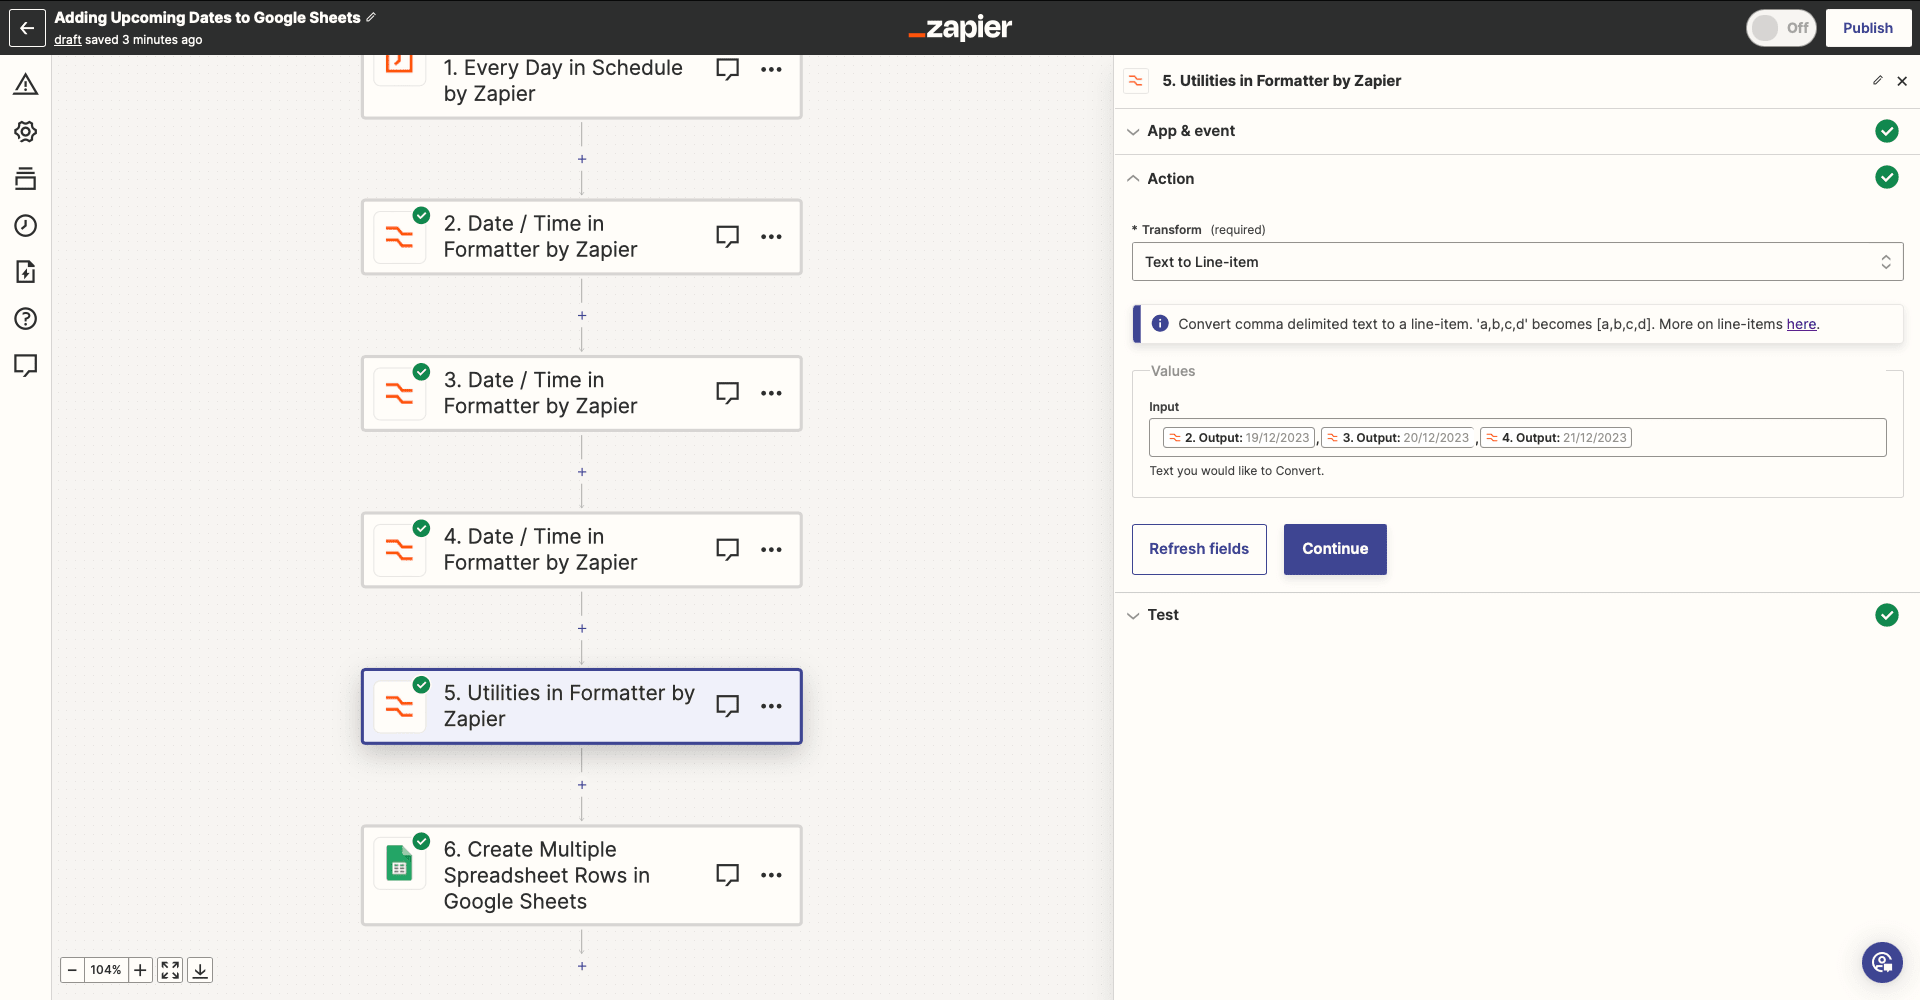
Test the action.
Action: Create Multiple Spreadsheet Rows in Google Sheets
Choose Google Sheets as the app and Create Multiple Spreadsheet Rows as the event. If you haven’t connected your account yet, you will be prompted to log in.
Set up the event by selecting the correct drive, spreadsheet, and worksheet, then mapping the scraping date and flight dates (as line-items) to their corresponding fields.

Test the action. You should see your URL generation sheet populate itself with the dates and search URLs.

Set up a Zap to Scrape Flight Data from New URLs
This zap will scrape flight data every time URLs are generated from upcoming flight dates.
Create a new zap, then set up the following events:
Trigger: New Spreadsheet Row in Google Sheets
Choose Google Sheets as the app and New Spreadsheet Row as the event.
Select your spreadsheet and the worksheet set up for URL generation.

Test the trigger to ensure Zapier is able to find new rows.
Action: Create Run in Browserbear
Choose Browserbear as the app and Create Run as the event. You’ll need to connect your Browserbear account using your API key.
Select your scraping task, then map the search URL from Google Sheets to the Step 1 / Go dynamic field.

Test the action. You can check your Browserbear Logs to see if the task is successfully completed.
Set up a Zap to Save Scraped Data to Google Sheets
The last zap will save extracted data to Google Sheets, making it easy to view and organize.
Create a new zap, then set up the following events:
Trigger: Run Finished in Browserbear
Choose Browserbear as the app and Run Finished as the event.
Select your scraping task.
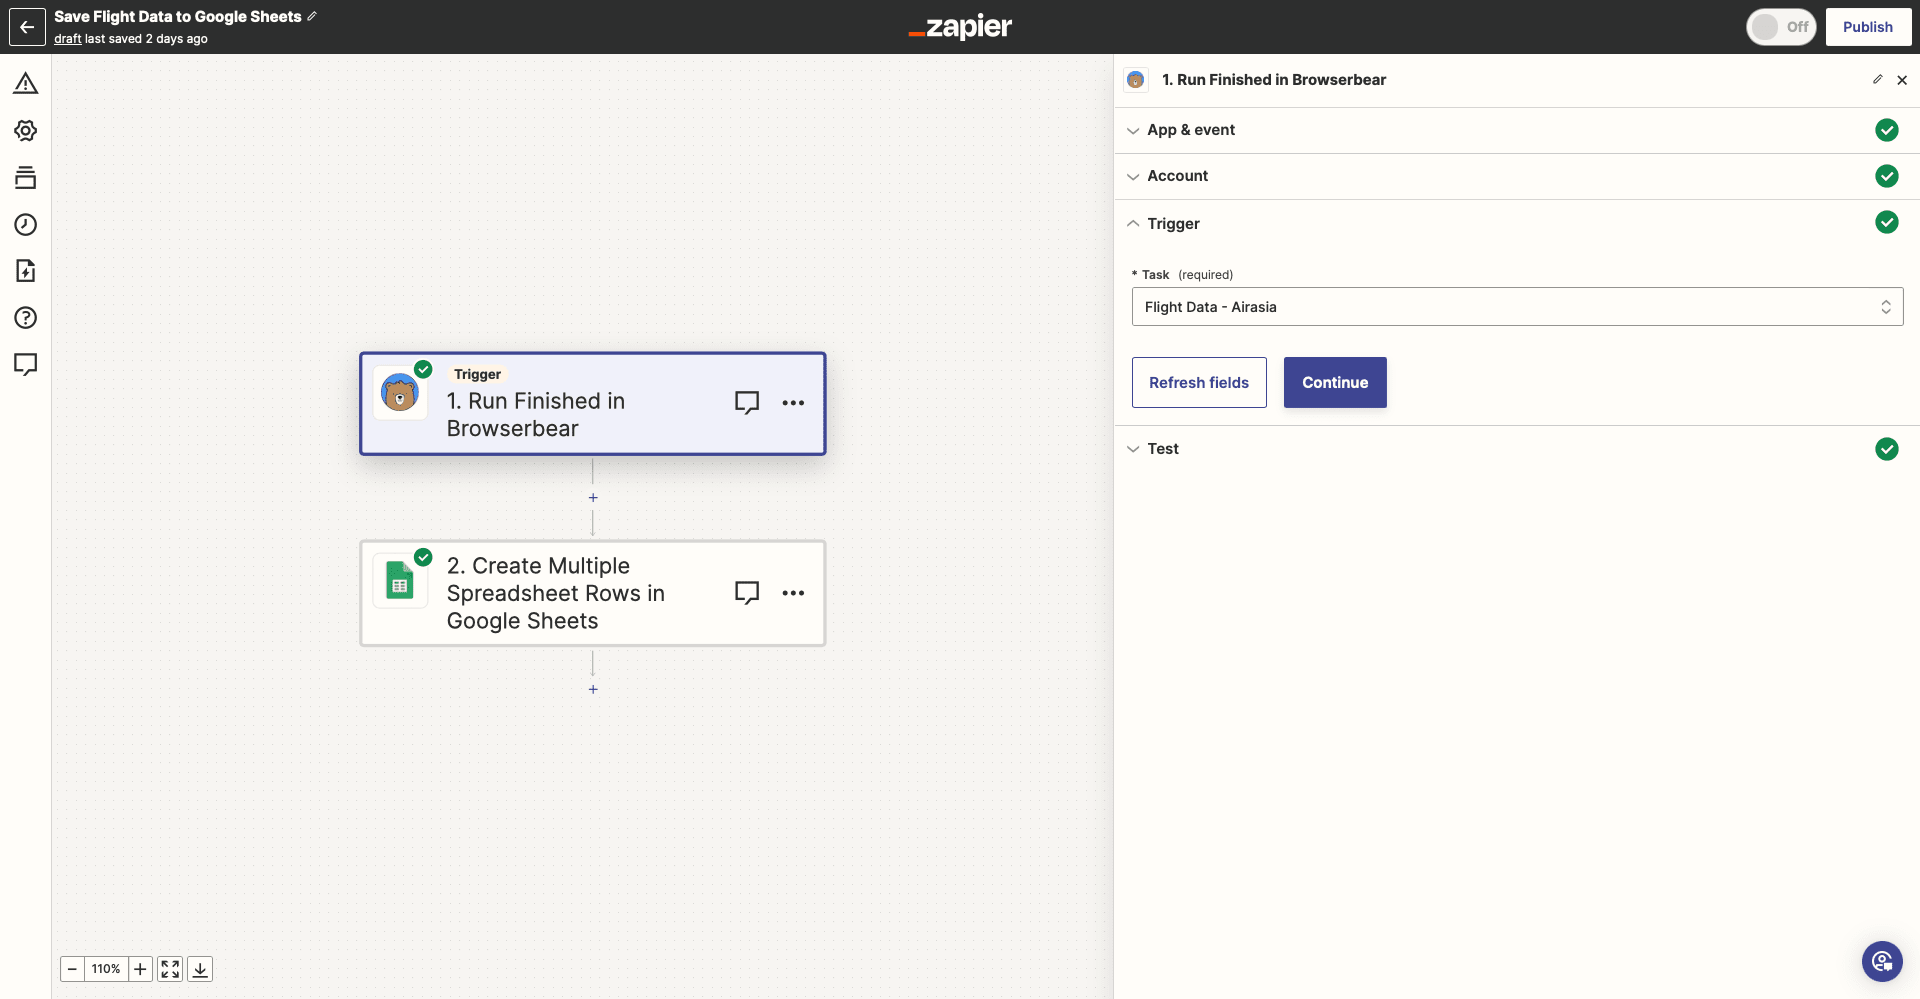
Test the trigger to ensure records can be found.
Action: Create Multiple Spreadsheet Rows in Google Sheets
Choose Google Sheets as the app and Create Multiple Spreadsheet Rows as the event.
Select your spreadsheet and the worksheet set up to save all extracted data. Map each child element field to its corresponding column.
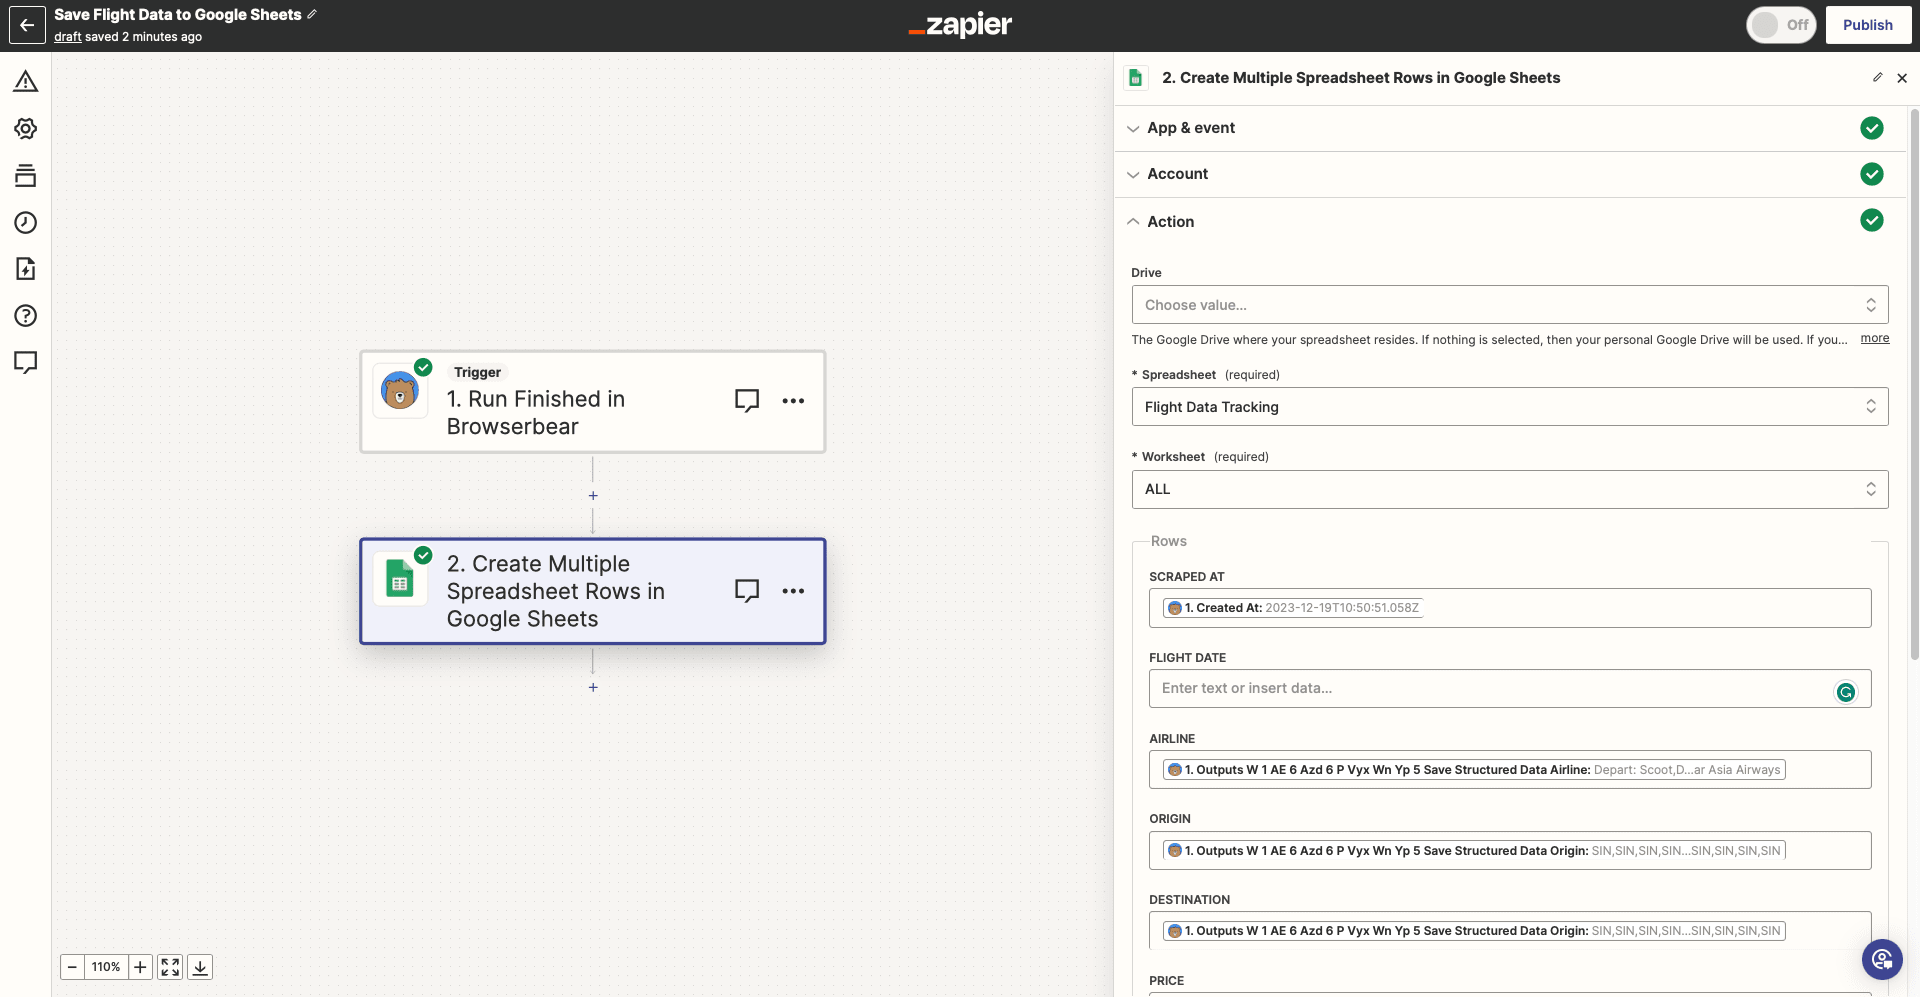
Test the action. You should see your spreadsheet auto-populate itself with multiple rows of scraped data.

Stay on Top of Flight Ticket Prices
If you’re a frequent traveler, having all upcoming flight prices for certain routes stored in a single spreadsheet can be incredibly convenient. You can easily spot cheap flights and get tickets before prices change.
You can save even more time by extending this automation in several directions, such as:
- Taking actions based on dips in ticket prices
- Setting up notifications when data is scraped
- Using filters to sort flight data by airline, time price, etc.
- Preparing dynamic graphs to show pricing trends
The options are endless! Take some time to consider your use case, then build a workflow that matches your unique needs. Whether the final result is a simple spreadsheet with filters or a complex workflow tricked out with a dozen different actions, automation can save you valuable time every day.


