How to Find Elements by XPath Using Selenium in Python
Contents
If you’re using Selenium to automate a browser, whether it’s to run automated tests on web applications, scrape websites, or automate other monotonous tasks, locating HTML elements on the web page is mandatory. You need to locate the HTML elements and interact with them to perform actions like clicking on a button, entering text into an input field, and submitting a form on the web page.
While there are several methods to locate an HTML element on a web page, XPath is a locator strategy that allows precise targeting of elements within the Document Object Model (DOM) of a web page. In this article, we will explore how to find elements by XPath using Selenium in Python.
What is XPath
XPath (XML Path Language) is an expression language used to navigate through elements and attributes in an XML or HTML document. It provides a way to traverse the DOM tree and select specific elements based on their attributes, attributes' values, or positions within the document.
An XPath expression is like a map that leads you to the target HTML element from a starting point. It typically starts with / for an absolute path or // for a relative path, followed by the child elements’ names.
An absolute path starts from the document's root element and navigates down the hierarchy of the elements until the target element is found.
/html/body/div[1]/div[1]/div[1]/div/div/div[1]/div/div/h1
On the other hand, a relative path starts from a known element and provides a path to the target element based on its relationship to the element.
//div[@class='menu']/ul/li[3]/a
Besides stating only the element name, you can also add [@attribute='value'] after the name to select an element with a specific attribute and attribute value, like div[@class='menu'] in the relative XPaths above.
There are also other ways to locate an element more precisely and we'll learn them later in this article.
Finding an Element by XPath Using Selenium
Selenium provides the find_elements() method to locate HTML elements on a web page using different locator strategies, with the options being ID, name, XPath, etc. To locate an HTML element using an XPath expression, call the method with By.XPATH followed by the XPath expression in the parameter, for example:
find_elements(By.XPATH, '//button')
To show how it's used in the code, here's a step-by-step guide:
Step 1. Install the Selenium Package
Make sure you have Selenium installed. Otherwise, install it by executing the command below in your terminal/command prompt :
pip install selenium
Step 2. Install the Browser Drivers
To automate the browsers, you need the browser drivers. There are a few methods to install the drivers, with the easiest method being downloading them from the official website and configuring Selenium to use the specified drivers using one of the options below:
Option 1: Save the Driver Location in the PATH Environment Variable
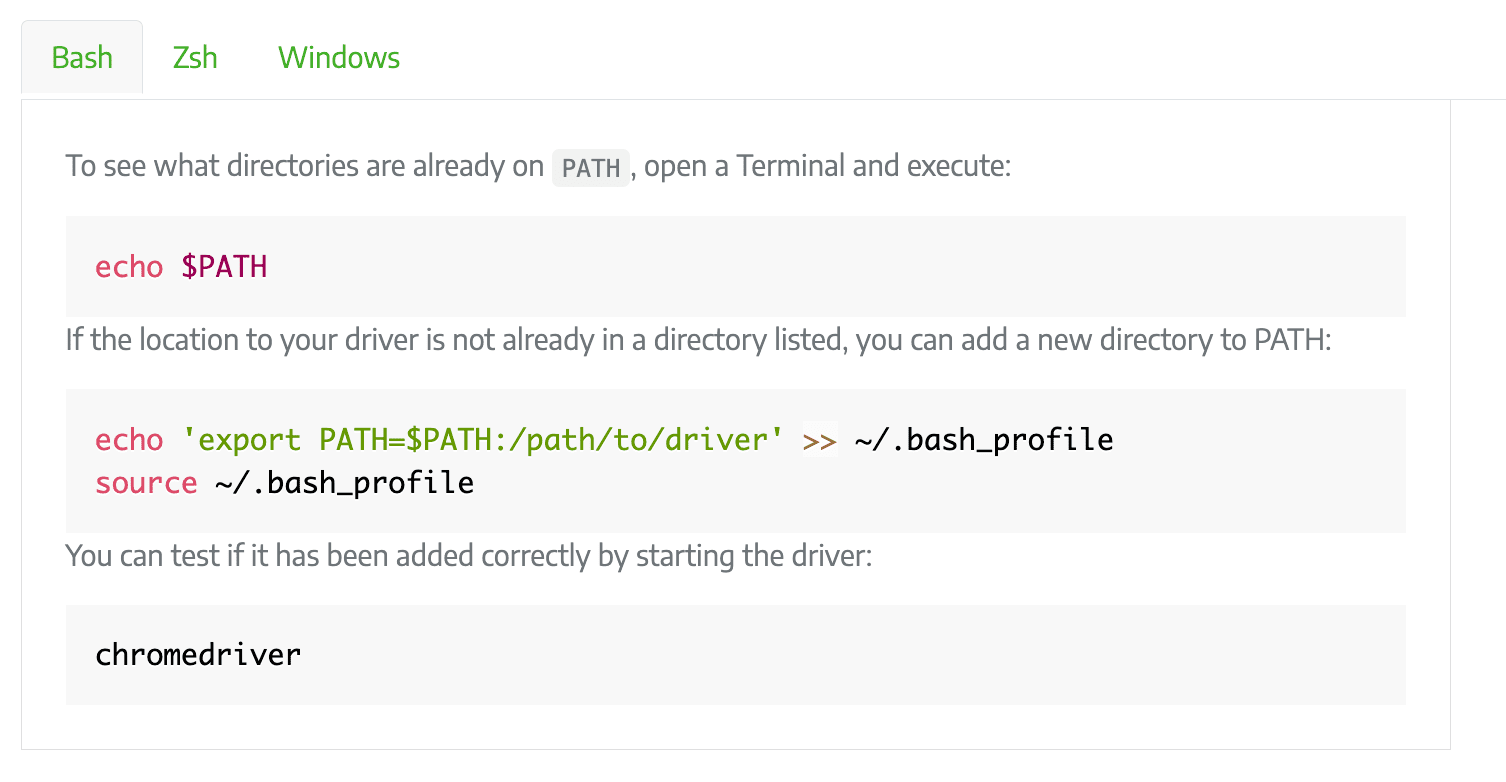
You can place the drivers in a directory that is already listed in PATH or add the drivers’ location to PATH. To save them to the PATH environment variable, run the commands below in the Terminal or Command Prompt:

In your code, import the Selenium package and create a new instance of the driver:
from selenium import webdriver
driver = webdriver.Chrome()
Option 2: Specify the Driver Location in Your Code
You can also hardcode the driver’s location to save the hassle of figuring out the environment variables on your system. However, this might make the code less flexible as you will need to change the code to use another browser.
In your code, import the Selenium package. Then, specify the location of the driver and create a new instance of the driver:
from selenium import webdriver
driver_path = '/path/to/chromedriver'
driver = webdriver.Chrome(executable_path=driver_path)
Step 3. Navigate to the Target Web Page
After completing the Selenium setup, we can visit the target web page using the get() method:
driver.get("https://playground.browserbear.com/jobs/")
Step 4. Find the Element by XPath
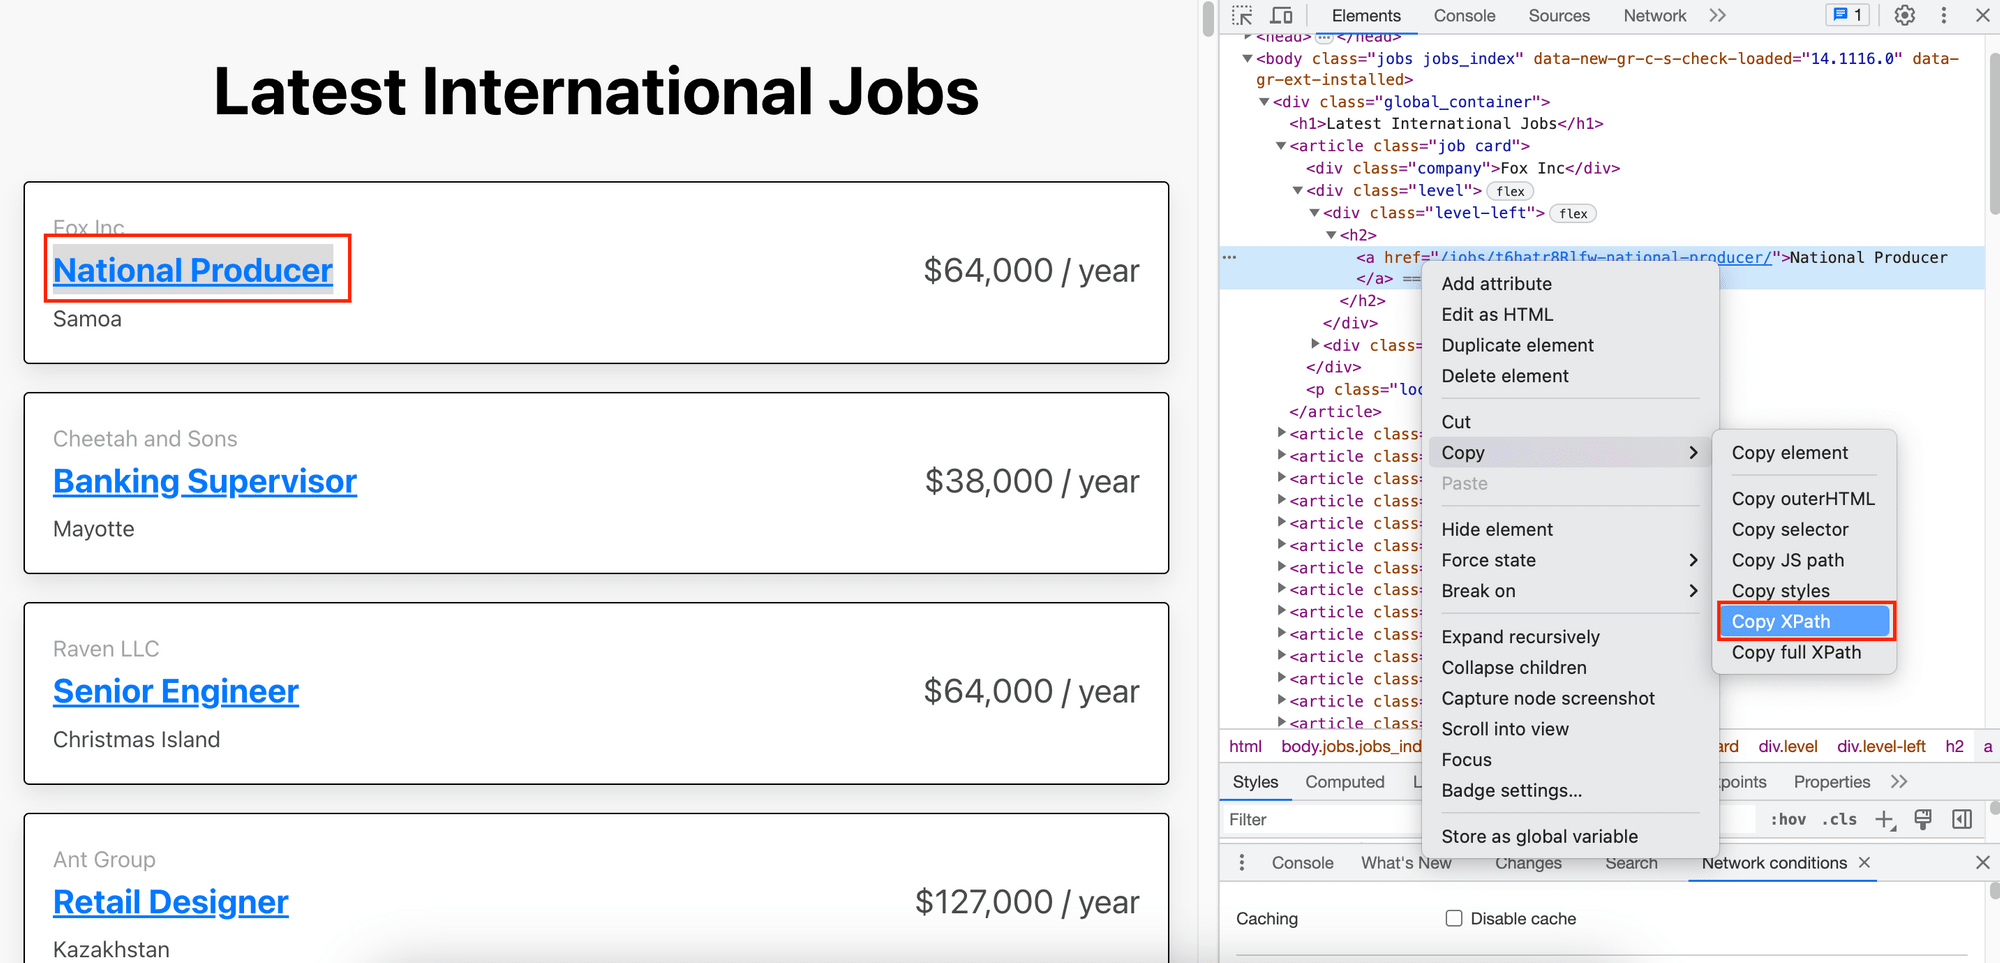
Now that we have navigated to the target web page, we can locate elements using XPath expressions. To get the XPath of an element, right-click on the element, click on “Inspect”, and copy its XPath from the browser inspector, as shown in the screenshot below:

The XPath for this element is /html/body/div[1]/article[1]/div[2]/div[1]/h2/a. To use it to locate an HTML element, pass it as the second parameter of the find_elements() method:
job_title = driver.find_elements(By.XPATH, "/html/body/div[1]/article[1]/div[2]/div[1]/h2/a")
Step 5. Interact with the Element
After that, we can perform actions on the selected element, such as clicking it.
job_title.click()
Step 6. Close the Web Driver
Lastly, quit the web driver.
driver.quit()
Advanced XPath Expressions
Using XPath Axes
Besides selecting elements based on their position in the HTML/XML document like the example shown above, XPath also provides axes that allow you to navigate through the DOM relative to the current node. This makes XPath even more powerful and flexible for locating elements in complex web pages.
Some of the commonly used axes include:
- Ancestor
Selects all ancestors (parent, grandparent, etc.) of the current node.
Example://a/ancestor::liselects all<li>elements that are ancestors of<a>elements. - Parent
Selects the parent element of the current element.
Example://a/parent::or//a/..selects the parent element of<a>elements. - Following
Selects all elements that appear after the current element in document order.
Example://div/li[2]/following::aselects all<a>elements that appear after the second<li>element. - Preceding
Selects all elements that appear before the current element in document order.
Example://div/li[2]/preceding::aselects all<a>elements that appear before the second<li>element. - Following-sibling
Selects all sibling elements that appear after the current element.
Example://li/following-sibling::liselects all<li>elements that are siblings of<li>elements and appear after them. - Preceding-sibling
Selects all sibling elements that appear before the current element.
Example://li/preceding-sibling::liselects all<li>elements that are siblings of<li>elements and appear before them. - @
Selects the attributes of the current element.
Example://a/@hrefselects the href attribute of<a>elements.
Let's consider an example where we want to find the parent element of an <a> element with the ID “menu”. The code to find it by XPath using Selenium would be:
parent = driver.find_elements(By.XPATH, "//a[@id='menu']/parent::")
Combining Multiple Conditions
You can also combine multiple conditions to create a more precise and targeted expression by using logical operators such as and, or, and not in the XPath expressions.
For example, if you want to find an input element with a specific class and name attribute, you can use the and operator like this:
element = driver.find_elements(By.XPATH, "//input[@class='search-input' and @name='query']")
To select an input element with either of the specified class names, use the or operator like this:
element = driver.find_elements(By.XPATH, "//input[@class='class1' or @class='class2']")
To select an input element that does not have the attribute "attribute_name", use the not operator like this:
element = driver.find_elements(By.XPATH, "//*[not(@attribute_name)]")
Handling Dynamic Elements
Sometimes, web applications generate dynamic IDs or other attributes for elements. These dynamic changes can make it challenging to write XPath expressions for locating the elements. In such cases, you can use partial attribute matching or wildcards to find them.
For example, you can use the starts-with() function to locate an element whose ID changes dynamically but always starts with a prefix:
dynamic_element = driver.find_elements(By.XPATH, "//*[starts-with(@id, 'prefix_')]")
You can also locate an element whose ID changes dynamically but always ends with a suffix using ends-with():
dynamic_element = driver.find_elements(By.XPATH, "//*[ends-with(@id, '_suffix')]")
Matching Text Content
XPath also allows you to locate elements based on their content or elements containing specific text using the text() and contains() functions.
To find an element by its exact text, use text():
element = driver.find_elements(By.XPATH, "//p[text()='Hello, world!']")
If you want to find an element containing specific text, use contains() instead:
element = driver.find_elements(By.XPATH, "//p[contains(text(), 'Hello')]")
Conclusion
While XPath is one of the most versatile methods to locate an HTML element from a web page, constructing an XPath expression might seem confusing if you’re new to it. Fortunately, there are tools that can help you. Besides copying XPaths from the browser inspector, you can also use Chrome extensions to generate different XPath variations, depending on your preference and requirements.
Once you’re able to locate elements on the web page, you can automate various browser tasks. Not sure what you can automate? Check out these 5 ideas!


